One of the best kept secrets in the Google Apps for Education Suite is Google Drawing! Google Drawing allows you to upload and manipulate images, add lines, text boxes, arrange shapes, add active links...it provides tons of flexibility. It is like a blank poster board or piece of paper!
After attending a Concord Fellows Google Tools course, Heather Mahoney created this Google Drawing.

(For those of you who haven't had the opportunity to meet Heather, she is tasked with helping SPED students transition to their post secondary life. Her role often involves visitors from outside CCHS! She is located in Room 248 with Sheila Murray.)
(Rebecca Lindamood, who also attended this training, used Google Drawings as part of her Faculty presentation a few meetings ago).


After attending a Concord Fellows Google Tools course, Heather Mahoney created this Google Drawing.

Heather has given full permission to copy this graphic without Attribution!
 |
| Heather Mahoney |
(For those of you who haven't had the opportunity to meet Heather, she is tasked with helping SPED students transition to their post secondary life. Her role often involves visitors from outside CCHS! She is located in Room 248 with Sheila Murray.)
(Rebecca Lindamood, who also attended this training, used Google Drawings as part of her Faculty presentation a few meetings ago).
What can I use Google Drawings for?
As a teacher......
Within a Google Doc or Sheet
I often need to take screen shots and add text or arrows to help explain how to navigate software apps. I just click Insert>Drawing and the Google Drawing workspace opens. The tools are easy to use, and very familiar if you are a Google Slides user! Then I click Save & Close, and it appears in the document!
The best part? If I need to make changes, I don't have to find the original graphic, make a change, delete the old one, then add the updated version....... I just double click within the document! The Drawing workspace opens and I make my changes!
As an image
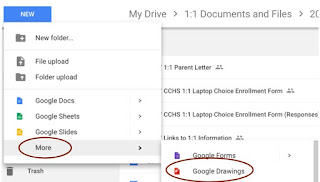
From Google Drive, click New>More>Drawing.

A new Drawing space will open, and you can import an image, add text boxes, arrows, etc. - all the tools to create the image you want. The Drawing is available for adding to a Google Doc or Sheet, or downloading as a .pdf or image file!
With Students.........
There are so many ways to use Google Drawings with students! The tools are intuitive, so students should be able to easily complete their projects!
Interactive Multimedia Posters
Google Drawing gives students all the tools to make eye catching, interactive posters.
Infographics
You have probably seen these - they are everywhere on the web. Eye catching and informative!
 |
| https://c1.staticflickr.com/7/6035/6331922783_3db8a71fc8_b.jpg |
In many ways their preparation requires the same steps as a writing assignment: Select a specific topic, do lots of research, summarize the knowledge, and write with your reader in mind. The Noun Project is a great resource for icons for these projects! (Note: Canva is also a great tool for infographic projects!)
Timelines
Timelines help students understand the chronology of events in a book or a time in history. Students can easily add graphics and links to provide richer information surrounding the events on the timeline! Want some ideas to elevate the Depth of Knowledge needed to create a timeline project? Check out these suggestions by Matt Miller from Ditch that Textbook!
Graphic Organizers
Graphic Organizers are a great way for students to do pre-work for larger essay or presentation projects they are are working on! Click here for 15 pre-made Graphic organizers using Google Drawing, courtesy of Matt Miller from Ditch that Textbook!
Tips for Creating Graphics:
- Have students sketch out complex infographics on paper first.
- Use shapes and lines to connect information or to draw attention to certain areas of your Drawing.
- Use 2 or 3 fonts.
- Use graphics and/or color to create a focal point.
- Don't make things too crowded, white space is good!
- Use Command + K to automatically add links.
- Live links will not be active if the Drawing is saved as an image file (.jpeg, .png). If you want live links, share the Drawing through Google Drive or download as a .pdf.
Tips for Using Google Drawing:
The learning curve is very short for using Google Drawing tools. Your students should catch on really quickly. Below are some more advanced tips when using Shapes:
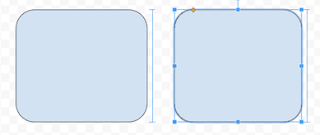
Equal Size: Blue Lines will tell you that the shapes are a similar size.

Equal Space: Blue bracket lines tell you that the spacing between shapes is equal.

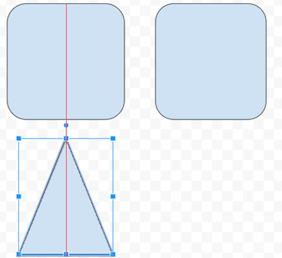
Lining up: Red lines tell you when shapes are in line or centered.
Moving Shapes: You can move shapes slightly by highlighting them and using the arrow keys. For even more control, hold down the shift key while using the arrow key for an even smaller movement!
Lining up Multiple Shapes: Arrange multiple shapes by selecting all the shapes. Then use Arrange from the top menu bar, and select how you want to arrange the shapes!
Please let me know if you think of other creative ways to use Google Drawings for yourself or with your students!
Comments
Post a Comment