This time of year just seems to lend itself to assigning (digital) posters, reports, and slide presentations. Photos greatly impact the effectiveness of these types of projects!
 |
| Public Domain - no Attribution needed! |
The Problem:
Most students will search Google Images for their photos. They see a beautiful array of images, many which are copyrighted. A part of their CCHS education is learning the responsible use of other's intellectual property.
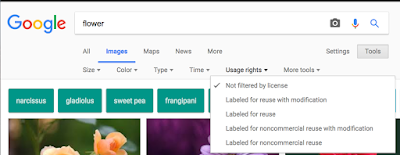
To see for yourself how many of the photos are copyrighted, search for an image using Google>Images. The default view is "all photos". Now click Tools, and new menu options appear above the photos displayed. Select a more prohibitive license under Usage rights, and see how your search results are altered.)

The Solution:
Use websites that have curated photos where the license type is either public domain or a version of the Creative Commons Licenses now available. (more about those later!)
Creative Commons Search (search.creativecommons.org)
This website allows you to search many different photo websites (Google & Flickr included) with licensing that allows you to use the photos. You can optionally search for photos that allow you to adapt them or use them commercially. Their beta site provides one click Attribution!
Photos For Class (photosforclass.com)

This website, designed specifically for students, offers photos AND embeds the correct Attribution into any selected photo! Notice the attribution located at the bottom of the picture on the right taken from this website!
Google Apps (drive.google.com)
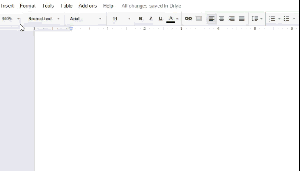
I was so surprised to learn that Google apps has built in license searching! When in a Google Doc, Slide, or Drawing, select Insert>Image and click on the Search tab. The default search is 'Commercial use with Modification', which more than fits our needs. You can search stock photos, or the Google or Life archives. See the animation below that shows how to do that, courtesy of Matt Miller's Blog 'Ditch That Textbook'.
PhotoPin (photopin.com)
Pixabay (pixabay.com)
Compfight (compfight.com)

Other Options:
PhotoPin (photopin.com)
Created for bloggers, anyone can use!
EveryStockPhoto (everystockphoto.com)
Photos that are 'Public Domain' licensed:
Pixabay (pixabay.com)
Free photos that are all Creative Commons licensed and require no Attribution!
Wikimedia Commons (commons.wikimedia.org)
Wikipedia's lesser known cousin, they offer not only photos but video and all media types using either Creative Commons or Public Domain licensing.
Compfight (compfight.com)
This site is an image search engine, and searches across many photo websites. The power is in their filters which allow you to narrow the license type you need.
These are just a few examples of sites that cater to people looking for photos that can be legally published!
Licensing Explained:
The different licensing methods can be confusing, so let’s talk about what they mean. Below is easy to understand language from Matt Miller’s blog ‘Ditch That Textbook’:
Copyrighted images (all rights reserved): It’s like the photographer is saying, “This picture is mine. Mine, mine, mine. And you can’t have it. Unless I say you can in advance.”
Creative Commons images: It’s like the photographer is saying, “This picture is mine. I’m the creator. But you can use it. Just use it in this way only and say where you got it.”
Public Domain: According to Wikipedia, rights for this intellectual property type "have expired, been forfeited or are inapplicable." There is no need to Attribute media with this license designation.
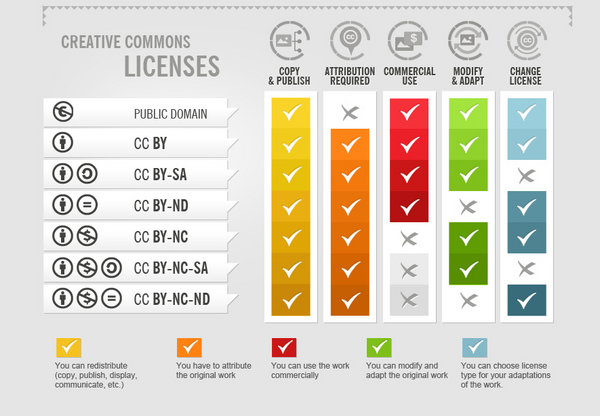
Creative Commons Licenses:
Within the Creative Commons image licenses, creators can have variations based on how strictly they want their work controlled:

Link to Infographic, courtesy of Fotor.com
(Creative Commons licensing allows reprinting of Graphic!)
(Creative Commons licensing allows reprinting of Graphic!)
Attributions explained:
(from the Creative Commons website)
 Attribution (by)
All CC licenses require that others who use your work in any way must give you credit the way you request, but not in a way that suggests you endorse them or their use. If they want to use your work without giving you credit or for endorsement purposes, they must get your permission first.
 ShareAlike (sa)
You let others copy, distribute, display, perform, and modify your work, as long as they distribute any modified work on the same terms. If they want to distribute modified works under other terms, they must get your permission first.
 NonCommercial (nc)
You let others copy, distribute, display, perform, and (unless you have chosen NoDerivatives) modify and use your work for any purpose other than commercially unless they get your permission first.
 NoDerivatives (nd)
You let others copy, distribute, display and perform only original copies of your work. If they want to modify your work, they must get your permission first.
Hopefully, this information is useful and you can incorporate it into your next project with students!
All CC licenses require that others who use your work in any way must give you credit the way you request, but not in a way that suggests you endorse them or their use. If they want to use your work without giving you credit or for endorsement purposes, they must get your permission first.
You let others copy, distribute, display, perform, and modify your work, as long as they distribute any modified work on the same terms. If they want to distribute modified works under other terms, they must get your permission first.
You let others copy, distribute, display, perform, and (unless you have chosen NoDerivatives) modify and use your work for any purpose other than commercially unless they get your permission first.
You let others copy, distribute, display and perform only original copies of your work. If they want to modify your work, they must get your permission first.
Comments
Post a Comment