
I always think of the iconic Sound of Music song 'These are a few of my favorite things' around this time of year. Maybe because it is a happy song, or maybe because the end of the year is a time to reflect on small things that make you happy!
3 things that make me happy with Google Drive!
#1: Emojis can be included in your Google Drive Folder names!

If you recently attended one of the 'Organize your Drive, Organize your Life' offerings, you likely got really excited when you discovered you can color code your folders! Now, you can add icons to your Folder names as well! They can help you quickly find that folder!
Navigate to one of the following free emoji websites (there are probably others!) recommended by Richard Bryne, author of the Free Tech for Teachers blog.
 |
| Image courtesy of FreeTech4Teachers.com |
Then, Control + Click on your folder and select 'Rename'. Paste your emoji where you want it (you can keep the text as well) and you now have a descriptive image along with the name of your folder! Bonus: if you place the icon before your folder name, it moves to the top of your folder list!
#2: Search for images without leaving Google Docs!
You (and your students) no longer need to leave Google Docs or Slides when looking for images to insert! Click Tools>Explore to open a side menu. You can now search for web pages and images without leaving your Google Doc or Slide!


A lot of great things go on when you (and students) use Explore:
- Google uses AI (Artificial Intelligence) to identify the topic of your Doc/Slide deck.
- Based on the topic, Google automatically provides web pages & images related to your topic!
- Images searched using Explore come from:
- Google Images
- Life Magazine photos
- Stock photography
- All photos seen in Explore are authorized for teacher and student use! (If you click the thumbnail, the larger view of the photo includes the specific usage rights.)
#3 Edit Images in Docs and Slides
Did you know you can resize, crop, add a border, or reshape images right inside Docs & Slides? These techniques can really add personality and pizzaz to your documents and slide decks!
Resize an image:
Click once on the image. Use the blue handles to change to the size you would like. Use the corner blue handles to keep proper proportion. (You probably know this one!)
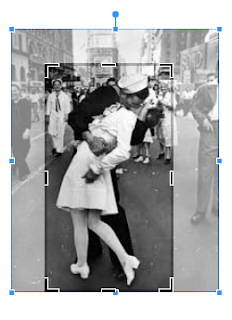
Crop an image:
In Google Docs, double-click on an image (or click Edit at the bottom after a single click.) In Slides, click the image. Select the Crop tool.

Use the black handles to select the part of the photo you want.

Click Enter, and you have your new cropped image!
Add a border:
Click your image. Use the toolset shown below:

- Pencil - choose your border color
- Middle tool - choose your border thickness or weight
- Third tool - change from lines to dashes

Maroon border with 4 pt. weight
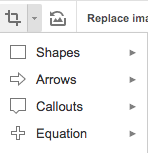
Reshape your image (Google Slides only!)
Google Slides gives you an additional feature for adding interest and effect to your presentation - reshaping images!
Click on your image, and then the arrow next to the Crop tool. Select one of the many shapes, and your image is magically the new shape!
 |
| Image courtesy of 'Shake Up Learning' by Kasey Bell |
Don't like your changes?
Simply click the reset icon, and your image is restored to its original form!

Comments
Post a Comment