Fall sports are in full swing, and the Activities Fair will be held soon! Before the month is out, we will submit many of our School Sponsored International Trips for School Committee review. If you are a coach, club advisor, or trip organizer, connecting with students and parents can be time-consuming. There are several ways to set up systems to communicate with these students and/or parents. One option is to create a snapshot in Aspen.


Gmail Contacts List:
You can navigate to the Contacts app (which works with Gmail) and create a contact list. Click the +Create Label (what Google calls the Contact list) and name your list or label. Follow the directions below to add contacts:

If you have student and parent emails in a spreadsheet format (maybe from Form input), you can import the emails directly into the Contact list. Once created, you can access the list by typing the name in the To: section of a new email.
I hope one of these methods helps you provide the communication necessary for your clubs, sports teams, or trips.
Why create a snapshot in Aspen for clubs, sports teams, or trips?
As a teacher, you can easily communicate with students in your classes. Communicating with students in clubs, sports teams, or trips means you need to access them under the Staff View>Student top tab with all 1300 students. If you create a snapshot in Aspen, you can specify that snapshot as a filter and with one-click access only the students you want to communicate with. When contacting students and/or parents, any email changes made in Aspen are automatically reflected.
How to create a snapshot in Aspen:
Step 1: Navigate to Staff View>Student top tab.
Step 2: Select the students in your club, sports team, or trip:

This part can be tedious. Below are a couple of tips to speed up searching for students:
Change your records per page to 1000.
Click Your Name>Set preferences on the top right. On the General Tab, change Records per Page to 1000. You can scroll down to select students without having to navigate through multiple pages:
You can also use the Search Box or Command + F to search the next student on your list.

Step 3: Show only those students you have selected:
Once you have chosen every student in your club or sports team, click Options>Show selected:

Create the Snapshot:
Click Options>Snapshots to retain the selected students as a snapshot.

The dialogue box below will appear. Click New. (You may need to make the box a little bigger to see the button.)

The next dialogue box should appear:

You should:
- Name your snapshot.
- Make sure you are saving it as a filter.
- Check 'Move to top of my list' if you want to move it to the top of your filter list.
- Double-check that the current student list is the data source used to create the snapshot.
- Click Save.
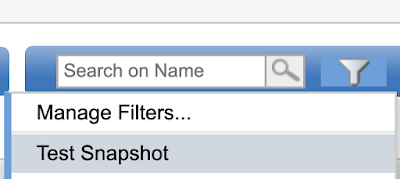
Click on the Filter to the right of your search box. The Snapshot appears there as a filter. Click on the snapshot any time you want only those students to show in Aspen.

Now that you have created the snapshot, click it to access only these students. Use Options>Email to easily send emails to the students and/or parents of these students. Any updates to contact information made in Aspen will be reflected in the communication.
Other Options
Creating a snapshot has one major downfall - it is a snapshot. You cannot add or delete students from the snapshot. If you need to make changes, you need to recreate the snapshot.
Below are a couple of other options for contacting students on sports teams, clubs, or attending school-sponsored trips:
Google Form and associated Google Sheet:
You can have students complete a Google Form providing their email and parent contact information. Create an associated Google Sheet through the Form. This automatically populates the Google Sheet with information and adds any future Google Form submissions that are made. You can use an add-on called Form Mule to email students and/or parents easily from the Sheet.
The con to this format is parent contact information isn't updated automatically, plus you need to learn to use the relatively simple tool.
Gmail Contacts List:
You can navigate to the Contacts app (which works with Gmail) and create a contact list. Click the +Create Label (what Google calls the Contact list) and name your list or label. Follow the directions below to add contacts:
If you have student and parent emails in a spreadsheet format (maybe from Form input), you can import the emails directly into the Contact list. Once created, you can access the list by typing the name in the To: section of a new email.
I hope one of these methods helps you provide the communication necessary for your clubs, sports teams, or trips.
Comments
Post a Comment